Illustrating a Children’s Book Cover for a Self-published Author

In this article, I will show you the process of illustrating a book cover for a self-published author. I’ll go through the different steps involved in the art-making process and show you the final product. For this purpose, we are going to look at 1 of the 4 book covers I did for Swedish children’s book author Lotta Hylander’s series Isa Och Minigänget.
A little background information: I had the pleasure of being retained by Lotta to illustrate her wonderful pony series about Minigänget (The Mini Gang), her herd of Shetland ponies after Lotta had seen my artwork online. Lotta was a joy to work with, and I’m excited to show you our process.
Step 1. Contract and Brief
The first step of any illustration commission is always signing a contract, negotiating the payment, and receiving a brief from the client. The contract protects both the illustrator and the client and ensures both of you understand what is expected for the job. It also outlines the cost, initial deposit and which rights are being transferred, and what the author can use the artwork for.
The author will provide the illustrator with a brief that describes what they have in mind for the artwork. They can also submit reference photos to help the illustrator get a visual.
In the case of this cover, Lotta provided me with a lovely document that had a clear description of what she had in mind for the art, along with photos that showed me what colors and feel she was looking for. She also sent me (adorable) photos of her ponies to draw from.
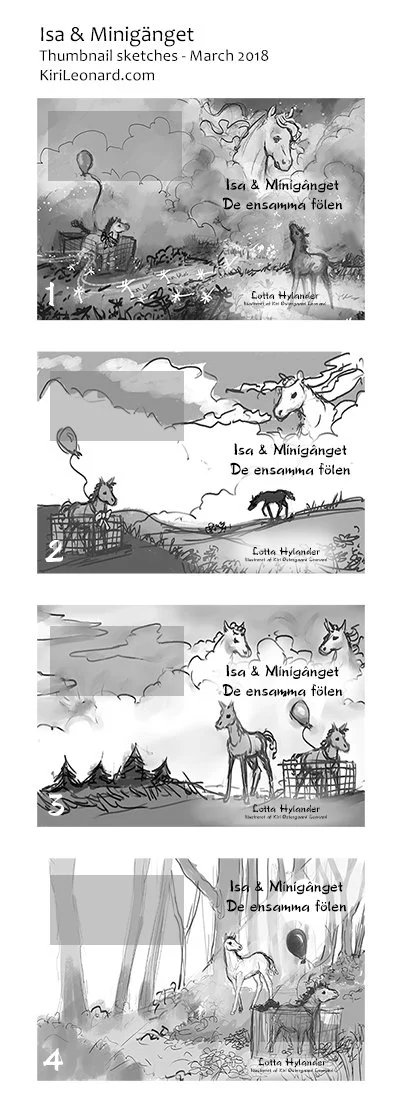
Step 2. Thumbnail Drawings and/or Initial Sketch
Depending on the job, the first thing I do is draw a series of thumbnail sketches or an initial rough sketch.
Because this was the 4th time Lotta and I worked together, and because Lotta had such a clear image of what she needed as outlined in the brief, it wasn’t necessary for me to do thumbnail sketches for this cover. However, for some of our earlier covers, I did thumbnail sketches, and I’ll show those to you here, so you can see what they look like.
When illustrating book covers, it is important to consider where the text is going to go. You do not want an important or busy part of the artwork under the text, as it will make it hard to read.
For this book cover I submitted a rough sketch. The first sketches for any job are intentionally rough, as the purpose of the sketch is simply to find a good composition and get a rough idea of what the piece might look like.
This first stage is open to any large (or small) changes the author might have, therefore there is no reason to spend time doing fine details just yet, that time would just be wasted if there are a lot of changes.

Step 3. The Color Rough
Once the author has approved the sketch, I do a color rough. The color rough will inform the author which colors the piece generally will have (they’re usually going to change a little as the piece is finished).
When the author has approved the color rough, the rendering of the illustration finally begins, and this is when I break out the reference images and start going into the details!
Since we didn’t do thumbnail illustrations, I included the text placement on the color rough for this piece. Look and this and compare it to the final posted above. You can see we now have a very clear roadmap of the direction we’re headed in.
This is the last stage, where the author can make any major changes.

Step. 4 – Painting the Final Illustration
Next, I begin rendering the illustration to get the final finish, this is the most time-consuming (and most fun!) part of the process, and generally, I do not share this step with the author until I have something close to final.
When the author is presented with the final artwork, they can request minor revisions. Two revisions are included in the initial fee. Any revisions after that are charged with my hourly rate. It’s important to communicate this with your client ahead of time, so they know when they can make changes. It will save both of you a lot of potential headaches and frustration!
Here is the final I submitted to Lotta.
Step. 5 – Preparing the Art Files
Once the author has approved the final artwork, I send them the final invoice. I email them the final art file package when the invoice is paid. I work out with the author ahead of time what they need for this package.
Usually, it will include a hi-res CMYK .tif version of the illustration (that is, the master print file), and a hi-res JPEG version. Sometimes my authors also request pre-formatted images for them to easily share on social media. This can include Instagram versions of the image, Facebook Banners/Covers, and similar.
This is a great service to offer to self-published authors who aren’t necessarily familiar with the various formatting requirements on the different social media platforms.
Step 6. The Book Reveal
And now, lastly, we have the final book reveal – personally approved by the ponies!


